Thursday, July 4, 2013

Berkley Method of Composting in 18 Days

I watched Geoff Lawton's instructions on a basic composting system.  This post summarizes the method Geoff described, which was a modified Berkley method.

First, your goal is to obtain a carbon:nitrogen ratio of between 25 to 30 parts carbon to one part nitrogen. The ingredients of your compost pile vary in richness of nitrogen.  A detailed table is at the link in this sentence.

Your pile ought to be at least 1 M cubed (about five feet).  Do not exceed 1.5M or you may compress the bottom of the pile and encourage anaerobic compost organisms.  Make the pile longer instead of higher.

Cover the pile to keep rain out of it.  You do not want to put the tarp or cover directly on the hot compost or you will encourage anaerobic organisms where the tarp touches the pile. Put branches or something on top to lift the tarp off the top of the pile.

The ingredient mix to achieve the right C:N ratio is approximately 1/3 high carbon (wood shavings, etc.), 1/3 green material, and 1/3 high nitrogen.  These ingredients are thoroughly mixed together.

Mix this together into a pile.  Use a long handled, three to five pronged pitchfork to manage the pile.  Use a rake to smooth it out.

At the beginning, you may use an activator in the middle of the pile.  That could be a dead animal, dead fish, chopped up comfrey or plant with lots of mineral content, or old good compost.  You do not need the activator, but it will help to speed up the process.

At day 4, turn the pile over.  Turn it again every other day thereafter until day 18.

All along you need to keep the moisture content approximately correct.  Geoff recommends a squeeze test.  You grab a big handful of compost and squeeze it tightly in your hands.  If you can get a single droplet to fall out, then it is the right moisture level.  If you can almost get a drop, it is ok.  If it dribbles a lot of drops, it is too moist.

Also, you must periodically test the temperature.  Unless you have a thermometer, you can do this by sticking your arm into the pile.  The temperature should be between 50 - 70 degrees C, but try to keep the temperature between 55-65 degreesC.

At day six, you need to test the compost.  If it is not hot enough, then something is wrong.  Here are the questions:

  1. Is it big enough?
  2. Is it too wet/dry?
  3. Is the mixture right?
You test the heat by sticking your arm into the pile toward the middle.  At 50 degrees C the pile will be uncomfortably hot.  70 degrees will burn and you will be unable to get you arm into the pile.  This is good. The temperature means that the compost is working hard.

If the pile gets too hot, then you will see a white powder developing on the pile.  That is a sign of anaerobic activity.  You need to cool it down some.

If something has gone wrong, you will need to add days lost until the compost is finished.

In the end, hopefully at day 18, smell the compost. It should be earthy smelling and not noxious.  It should be fine. It should be dark brown.  This material is full of beneficial soil life.  You may use it to make compost tea.

Different plants like different flavors of compost.  Trees like fungal rich compost.  Vegitables like bacterial rich compost.  You can mix into the compost different elements to encourage these preferences within a pile after it is done.

Geoff says flour makes a great addition to encourage fungal growth.  Mix into the pile three kilos of flour.  The fungal net will grow rapidly over ten days and then you have compost that is great for planting trees.


Monday, May 20, 2013

Red Wriggler Compost Bin: Manure See-Saw

I made a red wriggler compost bin for the worms I bought on March 15, 2013. The construction was pretty simple and easy. In early February, before the worms arrived, I just stacked up cinderblocks in the middle of my garden. I added a couple wheelbarrow loads of horse manure. I filled the area to the brim with the manure. We let the manure sit for a few weeks.

When the worms arrived, we put them into the manure-filed bin. Then, I covered it with some thick sheets of cardboard to keep the moisture inside. (I may add some plywood to the roof later this summer as it gets hotter.)

Over the early spring, the level of the manure decreased by about half. That means that over ten weeks, the 2000 starting wrigglers decreased the pile by fifty percent. Once there is nothing left to eat, the worms will die if you do not keep feeding them fresh manure. We did not start with tremendous quantity of red wriggers (relative to some systems). However, we believe (and hope) the wriggers are multiplying so this process should accelerate as their population gets larger and larger.

I shoveled the half-eaten manure from the eastern side of the bin to the west side. In the picture above, you can see what it looks like sloughed off to one side.

I went out to our horse pasture and gathered a barrow full of fresh manure. Then, I carted it up to the garden and dumped it into the once empty half of the bin. I still need to add one more barrow full of fresh manure. I covered the bin back with cardboard until I bring up the next load.

The wrigglers cannot eat the fresh manure. It is too hot for them, so they will safely stay over in the west side munching away on that stuff. Once that stuff is depleted, the wrigglers will migrate over to the east side that has the fresh manure and start munching away.

At that point, the plan is to harvest the castings from the west side and spread it into the raised beds and gardens for our plants.  What goes into the empty western side of the bin at that point?  You guessed it.  More fresh horse manure.

It is a worm manure see-saw.

Monday, May 13, 2013

Handling our Bucklings Situation


Our twin bucklings are about five weeks old now and they are very healthy young goats. The scabs on their head is from the disbudding procedure described earlier on this blog here.

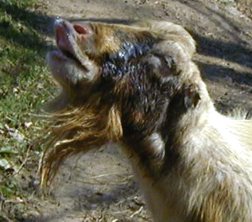
We do not want to have bucks. Bucks are nice if you want to start a herd, but we would like to keep our goat herd small. Plus, as suggested by the picture to the right, Bucks have some goat characteristics that we prefer to avoid. The picture shows a buck peeing on his own face. The upper lip is protruding so he can maximize the taste and smell the goat urine. The propensity to pee on one's own face, is probably one of the least offensive qualities of a buck.

We would like at least one or two more does, but God did not give us any this year. We are blessed with our bucklings, who we have named Johnny Bench (yellow collar) and Garcia (red collar). (I tell them apart because Johnny Bench has coloring on his forelegs that looks like shin guards.)

The video above was shot on Saturday, May 11, 2013, the day after we undertook the neutering procedure. Neutered goats are called "whethers."

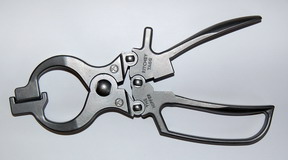
We opted to emasculate our goats with a burdizzo. FIASCO farm has a detailed description on how to undertake neutering male goats with a burdizzo here. We used a Richey Nipper tool (see left).

As recommended, we gave the young goats a tincture called Ow-Eezz to prepare them before we undertook the process. The process itself did not take long, only about five minutes per goat. The young goats were pretty sore for about two hours afterwards. The next morning, they were up and jumping around as normal. As you can tell if you watch the video, they are forgiving creatures.

Tuesday, May 7, 2013

Bee Hive Update

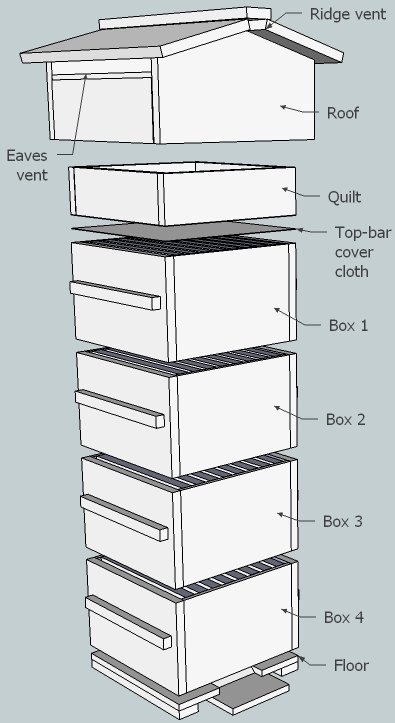
On May 2, 2013, I added a honey super, quilt, and roof to the bee hive. The picture to the left shows the construction of my first hive.

Starting with the top down, this posts discusses the new parts and the thinking behind them.

The telescoping roof was made with pine boards.  I tested it and it appears water tight.  The roof fits over top of the quilt.

The quilt is made from a medium narrow super.  I stapled burlap to the bottom of the empty box. Then, I filled it up with some alfalfa hay and pine shavings to about 1/2.   This is an insulation layer for the bees.  Hopefully, it will keep the hive cooler.  The idea is based on Warre' Hive design.

The last new piece was the medium super.  Like the bottom two hive bodies, it is full of foundationaless frames.  They do have starter strips of wax.  I glued them into the grooves of the frame top bars and tacked them down with a couple finishing nails.

I have another medium super that I will add eventually.  Don the Fat Bee Man does not recommend that you put too much empty space into a hive or it will demoralize the bees and set them back.

I also removed a plastic sheet that slid under the screened bottom board.  With spring having sprung, I don't think we are going to have anymore freezing nights.

All the new hive parts, like the old, are treated with linseed oil.  I used green spray paint on the roof for a little color and to match our house.

When I opened the hive, I discovered the bees had started building four combs in the second hive body.  The comb was white and empty except for bees crawling on it.  It is encouraging that the bees were already working hard on filling the second hive body box with drawn comb.  The drawn comb was beautiful.  I'm glad I didn't mar the bees work with foundation.

Note, some of the wax starter strips on the top bars in the second hive body were dangling down into the hive body.  I figure the bees will work around those.  Hopefully, the comb will keep going on straight.  I glued the starter strips to the top bars of the medium super so maybe it will hold this time.

Sunday, April 28, 2013

Shiitake Mushroom Dowel Spawn Innoculation and Lessons

This weekend I used up all my soy wax innoculating white oak logs with shiitake mushroom dowel spawn. I bought 1000 from Fungi Perfecti.

I made several purchases from Fungi Perfecti to create our first shiitake mushroom garden. First, I bought 100 plugs and one pound of soy wax.

The 100 plugs were not even enough to innoculate one 7 inch diameter, four foot log.  Therefore, I called and ordered 1000 plugs.

I used the 1000 plugs to innoculate the rest of the first log, and three more.  Then, I ran out of wax and gifted the rest of the spawn to my neighbor.  I think I had around 300-400 plugs left.

It is a pretty good bit of work to make a shiitake mushroom garden.  I'm talking about just the drilling and innoculation process after you gather the logs.  I have a pretty good drill and it still took several hours to do all the work.

Here are the steps you should follow to efficiently innoculate logs.  (These steps were discovered to be the most efficient after trial and error.)

  • Drill all of the 5/16 inch holes in a log.   Each hole is 4 inches from the next laterally.  Go down the log drilling holes.  Turn the log and drill holes about 2 inches below the first line, staggered so the new row lines up roughly in the middle of the previous row.  Turn and drill. Turn and drill.  Do this until you have rows of 5/16 inch holes all around the log.
  • Hammer in the plugs with a rubber mallet.  Hammer plugs into all holes.
  • Melt about 3 ounces of wax in a metal container.  Apply the was with a brush on each of the plug spawn to seal the log.  If you need more wax, refill and keep covering your spawn plugs.
  • Repeat the process log by log.
I used an empty bean can for my wax container and heated at very low over my gas stove.  If you try to cover too many plugs your wax will cool down before you can finish.

I like to do one log at a time because it gives a sense of accomplishment with each log. Also, my hands got tired of drilling after so many holes in a log.

I discovered that chickens like the taste of soy wax.  Keep your chickens away from your project or they may decide to eat your wax off your logs in your garden location.  Hopefully, my chickens do not decide to eat my wax!

I ran out of wax after four logs.  One pound is not enough.  I recommend you purchase the ten pound bag of wax and 1000 spawn.  That should insure you have enough wax to cover all your spawn.  1000 spawn will innoculate about seven or eight logs (6-7 inch diameter) cut to four foot lengths.

I stacked my logs horizontally about twenty feet into my zone five edge under the canopy of a large oak. Fungi Perfecti recommends a vertical stack, but I did not want to risk getting invasive fungus into my logs before the shiitake spreads throughout the wood.

I will need to move my stack from its present location.  I discovered that even though they are located under a large oak, my logs are getting some sun in their present location in the noon sun. The sunbeams shine right down through a hole in the canopy on top of my stack.  

No problem.  It just takes some manpower to move them.

Hopefully, we have shiitake next year around this time.  

Wednesday, April 24, 2013

Disbudding Kids

Our young bucklings are now going on two weeks old. At age four days, we undertook to disbud the young kids.

There are arguments for not disbudding goats. One, the horns are defensive and help to deter predators. Two, and more importantly, the horns aid the goat's circulatory system. A lot of blood flows through a goat's fully developed horns. The system helps a goat body adjust to extremely hot and cold weather. These are good reasons why a person would choose not to disbud her goat.

However, there are some negative aspects of horns. First, horns can be dangerous to other animals and people. Second, horns can be dangerous to goats in that they may cause a goat to become hung in fences or other objects.

We chose to disbud our kids for several reasons. First, our two adult does are disbudded so they would be disadvantaged in a herd of goats some of which have horns and some of which do not. Secod, we live in the temperate climate of the North Carolina piedmont so the circulatory system benefits of horns are less necessary at our homestead than in a more extreme environment. The primary factor for us was safety. We do intend to apply a paddock shift with the goats and they will encounter lots of fences. They also will be on pasture with our horses. The risk of a veternarian bill to treat a potentially disemboweled horse would be a problem for our family.

The procedure is to burn the young kid's head where the horns are just beginning to grow. The burning, if done successfully, destroys the goat's glands that cause the horns to grow. Our bucklings were disbudded at day five. Even at day five, you could feel the developing horns growing in the kids.

We gave our goats Ow-eze before the process. This herb intoxicated the animal. The procedure involved a small, narrow box. The four-day old kid was inserted into the box, which had an opening and lip on one end for his head. The kid's head was held against the lip and the tool, a hot iron made into a small circular ring, applied to and around the horn area. After burning the head, a spray was applied to the injury and the kid was returned to the herd.

Immediately after the procedure, one of the two kids seemed a bit disoriented (perhaps partially from the effects of the Ow-eez), but within an hour, the two bucklings were both running and jumping as if the experience and injury were totally forgotten.

Sunday, April 14, 2013

Geoff Lawton: Surviving Collapse--The Property Purchase Checklist

I just finished watching Geoff Lawton's second free video in his survival permaculture series.  This one is really good. I am happy I watched it before I started working on the earthworks on my homestead.  

Unfortunately, our home is located on the top of the hill, a site that is criticized in the video because its access to pressurized water is limited.

The image to the right is one of the graphics Geoff uses to illustrate basic permaculture design principles.  There is plenty of action shots, white board discussion, and generallized planning considerations for a new property.  

I liked the discussion on the impervious roadway.  I have one that bisects my property and it is causing some erosion problems.  


Highly recommend the video. To see the video, you must sign up for Geoff's email list. He promises to keep your email confidential.   The link to gain access to the video his here.
 

Sunday, March 31, 2013

Thinking about Chicken Paddocks

We have been free-ranging our little flock of four chickens.  They are good egg producers, with mostly superior quality.  We attribute the quality to the amount of protien the chickens obtain by freely attending to the most productive (i.e., wormy) areas of our property.

The problem is that we are planting beds.  We like flowers and plants growing there.  The chickens dug up and destroyed my wife's daffodill bed.  They dug up my row of onions, wiping out mostly all of my onion plantings in one location.  (Fortunately, they have not yet destroyed my other three onion beds.)

We just acquired six additional chickens.  A flock of ten could be destructive to our planting efforts.  Therefore, we are thinking of a means to contain our chickens.

Paul Wheaton's Raising Chickens 2.0: No More Coop and Run has some analysis on keeping chickens.

A thread on Permies discusses the chicken paddock shifting concept and throws out ideas here and there.

A mobile chicken coop is foremost on our thoughts now.  That will be needed if we are to paddock shift the chickens.

Possible construction materials for light weight coop that can be moved:
  1. Mesh wire;
  2. Polyethylene tubing;
  3. Metal tubing.
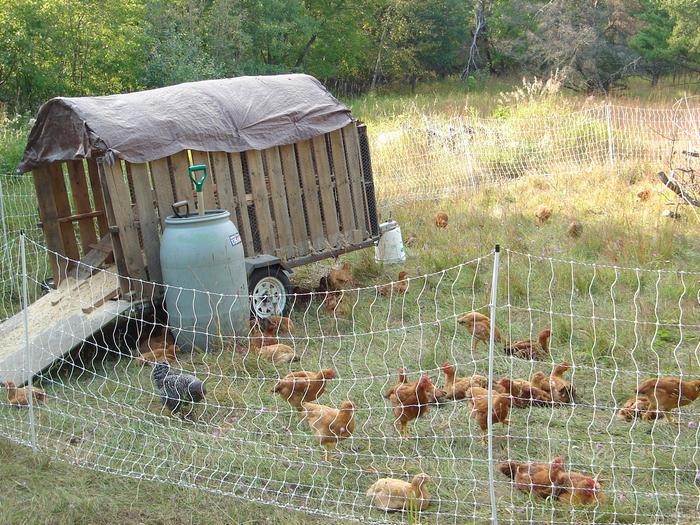
Alternatively, find an old trailer like the one pictured above.  May visit my neighbor to see about his broken down trailers.  He wants to sell one.

Most chickens do not fly over the floppy plastic netting.  They like to fly up and light on a taught top, then hop on.  The floppyness of a soft plastic wire netting keeps them from going over without wing clipping.  If you get a rogue, then you can hobble her.  


Sunday, March 17, 2013

paddock shifting video by greg judy

Here is a video of a presentation by Missouri farmer Greg Judy on paddock shifting.  Very nice concept.


Saturday, March 16, 2013

Chicken Flock Additions

We are stocking up on our depleted chicken flock. We now have only four chickens, two of which are poor producing Production Reds.
We aimed to buy hens that would provide a variety of egg colors.

The first addition is pictured to the left, ostensibly the Ameraucana. This breed produces medium-sized "Easter" eggs, light blue-greensish in color. We bought ours from the local feed store.

This chick, like most sold by commercial hatcheries, is more likely a mongrel rather than a true breed. Of course, since we are not breeding chickens that is perfectly fine with us.

We also bought two Buff Orpingtons. These chickens are reputed to docile and are average brown egg layers. This breed tends to become broody. Because they are docile, they are generally at the lower end of the chicken pecking order.

These birds are "dual purpose" and were originally raised for meat birds. Generally speaking, meat chickens do less well free-ranging as our girls live.

Finally for the chicken variety, we bought three silver Wyandottes from a local Spindale, North Carolina, breeder.  These chicks were raised by the grandfather of an employee of Oakland Feed and Seed in Spindale.

They were straight run chicks, meaning we do not know if we bought three hens, three roosters, or any combination thereof.  The good news is my wife said that we may get to keep a rooster if we have one in the three chicks.

The Wyandotte breed is much like the Buff Orpingtons.  They also lay brown eggs, maybe slightly more productive. They are docile chickens.

Lastly, what flock would be complete without some guinea fowl.  We bought six to add to our one guinea.  Guinea fowl are great tick-eaters, as well as other pests.  This is the first purpose.

We also are very happy with our guinea's defense of the chicken flock.  All his other species mates were killed by predators going into the winter.  However, our lone guinea survived and is the rooster of our flock of four free-ranging hens.  He watches for hawks, stands off dogs, and chirps at strangers and for lost hens.  He does a really good job in this capacity.

Guineas are also capable of producing some decent meat.  I haven't tasted guinea but it is said to be a cross between turkey and chicken, or a juicy pheasant flavor.


Friday, March 15, 2013

Vermicomposting: Red Wriggler Composting Worms

I ordered 2,000 Red Wiggler(Eisenia Foetida) composting worms from Uncle Jim's Worm Farm.  These are Pennsylvania worms so they will have to adapt to the western North Carolina heat.  We intend to feed the worms food scraps and horse manure.

Eisenia Foetida is a species of earthworm that lives on decaying material.  Colorado State published an article, Vermicomposting Horse Manure, which discussing setting up windrows.

Here is a blog post about how to rotate the worms and incorporate them into fertilizing gardens with chickens, TheModernHomestead blog, Raising Earthworms to Feed the Flock

Friday, March 8, 2013

Bio-Retention Water Catchment

Here are some images taken from the NC Water Conservation program handbook.  First, the diagram showing contours of the backyard wetland construction:


Next, a selection of drought tolerant wetland plants.


Here are the rain garden shrubs and perennial plants:


Below, some rain garden zone plants:


Here are some shallow water wetland plants:


Finally, some deep water plants.


Friday, March 1, 2013

Here is a picture of my brassicas (cauliflower, brussel sprouts, cabbage, and broccoli) growing in the soil cube mixture.  I followed the recipe of the soil cube instructions to make up my mix.

The seedlings are a bit spindly.  I will move my light source closer down toward the seedlings today and observe as to whether that improves their spindliness.

I also need to buy another grow bulb as I only have one installed in my grow tub right now.

Tuesday, February 26, 2013

Pasture Rotation Paddock Size Calculation


We have three horses.  Combined, they weigh about 3,000 pounds.  Using that figure, we can start to figure out the rotational grazing needs for our homestead.  Our horses eat a combined 80 pounds of dry forage per day.

We currently have about 4.5 acres of pasture.  First we need to figure out the grazable height of forage.  Estimate the height of grazable grass and legumes and clover (excluding seed heads, etc., which are not grazable).  Then, subtract three inches to deduct the non-grazable portion.  The difference is the height of grazable dry matter.

Next, use a "pasture stick" to estimate the quantity of dry matter in the pasture.  This figure gives you a number of grazable dry matter.

This is a total guess, but I estimate that we have about 1200 pounds of dry matter in each acre.  Based on this, it will take the horses about 15 days to eat most of an acre paddock of forage.  Need to get a pasture stick.

A rule of thumb is to graze animals when grass is 6 to 8 inches high. Rest grass when it is grazed down halfway (3 to 4 inches high).  “Graze ½, leave ½.” 

We need to establish five paddocks and rotate the horses through them.  


Monday, February 11, 2013

Goat Kidding Preparations


There is a lot of work to do to prepare for goat kidding.

First, you need a kidding stall.  We intend to use one of our two horse stalls.  By the beginning of April, we need to have it set up.  Probably, we will use a 12' fence gate to close it.

Second, we need a kidding kit.  We are using the FIAS Farms kit materials.  We already have most of the stuff on hand.  But we need to organize everything into a tote.

Third, we need to begin administering some herbs to prepare our goat. We are natural so we do not intend to vaccinate, or chemically treat our doe Edna. However, we will give her some of the herbal supplements she needs to reduce her delivery risks.

FIAS Farms created a spreadsheet to calculate some of the critical dates.  I charted them on my calendar.

Sunday, February 10, 2013

Jerusalem Artichoke, or Sunchoke (Helianthus tuberosus).


This plant is in the Asteraceae or Compositae family.  It grows to seven feet tall in rich and damp thickets.

The tubers are edible.   The tuber develops a pleasant sweetness during the winter, especially if subjected to frosts, and is then reasonably acceptable raw Otherwise it is generally best cooked, and can be used in all the ways that potatoes are used. The tubers are rich in inulin, a starch which the body cannot digest, so Jerusalem artichokes provide a bulk of food without many calorie. Some people are not very tolerant of inulin, it tends to ferment in their guts and can cause quite severe wind. The tubers are fairly large, up to 10cm long and 6cm in diameter. The tubers bruise easily and lose moisture rapidly so are best left in the ground and harvested as required. The inulin from the roots can be converted into fructose, a sweet substance that is safe for diabetics to use. The roasted tubers are a coffee substitute.

A very easily grown plant, it grows best in a loose circumneutral loam but succeeds in most soils and conditions in a sunny position. Plants are more productive when grown in a rich soil. Heavy soils produce the highest yields, but the tubers are easily damaged at harvest-time so lighter well-drained sandy loams are more suitable. Dislikes shade. Likes some lime in the soil. Jerusalem artichoke is reported to tolerate an annual precipitation of 31 to 282cm, an average annual temperature of 6.3 to 26.6°C and a pH in the range of 4.5 to 8.2. 

Jerusalem artichokes were cultivated as a food plant by the N. American Indians and they are today often grown in temperate areas for their edible tubers. There are some named varieties. 

The plant is a suitable crop in any soil and climate where corn (Zea mays) will grow. It survives in poor soil and in areas as cold as Alaska. It also tolerates hot to sub-zero temperatures. 

The first frost kills the stems and leaves, but the tubers can withstand freezing for months. 

The plants are particularly suited to dry regions and poor soils where they will out-yield potatoes. Tuber production occurs in response to decreasing day-length in late summer. Yields range from 1 - 2kg per square metre. The tubers are very cold-tolerant and can be safely left in the ground in the winter to be harvested as required. They can be attacked by slugs, however, and in sites prone to slug damage it is probably best to harvest the tubers in late autumn and store them over the winter. It is almost impossible to find all the tubers at harvest time, any left in the soil will grow away vigorously in the spring. 

Plants are sensitive to day-length hours, requiring longer periods of light from seedling to maturation of plant, and shorter periods for tuber formation. They do not grow where day-lengths vary little. The plant is good weed eradicator, it makes so dense a shade that few other plants can compete. 

The young growth is extremely attractive to slugs, plants can be totally destroyed by them. 

Members of this genus are rarely if ever troubled by browsing deer or rabbits. Grows well with corn]. Plants can be invasive.
                                    

Seed - sow spring in a cold frame. When they are large enough to handle, prick the seedlings out into individual pots and grow them on in the greenhouse for their first winter. Plant them out into their permanent positions in late spring or early summer, after the last expected frosts. Division in spring or autumn. 

Harvest the tubers in late autumn or the winter and either replant the tubers immediately or store them in a cool but frost-free place and plant them out in early spring. 

Jerusalem artichoke is propagated by tubers, which should be planted as early as possible in the spring when the soil can be satisfactorily worked. Late planting usually reduces tuber yields and size seriously. 

Whole tubers or pieces about 50 g (2 oz.) should be planted like potatoes and covered to a depth of 10 cm. Pieces larger than 50 g do not increase the yield, though those smaller will decrease it. Deeper planting may delay emergence, weaken the sprouts, and cause the tubers to develop deeper, making harvest more difficult. Basal cuttings in spring. Harvest the shoots when they are about 10 - 15cm long with plenty of underground stem. Pot them up into individual pots and keep them in light shade in a cold frame or greenhouse until they are rooting well. Plant them out in the summer.

Plants for a Future

Thursday, January 31, 2013

Shiitake Cultivation Planning

Maximizing Your "Mycelial Mileage", published at Fungi.com, has some interesting thoughts on mushroom cultivation.

My cultivation will be outdoors on oak logs.  Figuring out the best technique and location are in the cards.  One item in this article that jumps out is the recommendation to cut logs one to three months before innoculation.  Trees emit a natural anti-fungal substance soon after cutting.  This means I need to trim up my white oak so the branches can begin to calm down in preparation for innoculation later this year, in the spring.


The video below, issued by the UK Forestry Department, has a fair amount of technical information about shiitake cultivation.

Wednesday, January 23, 2013

NC State: BEES System Low-Cost Education

NC State offers low-cost education for beekeepers through the BEES System.  This looks like an excellent educational opportunity.  It's $25 for each course.  The beginner beekeeping program costs a total of $75.  If you pass the NC State test, the university will issue a electronic BEES Certificate of Completion.


Tuesday, January 22, 2013

Earth Users Guide to Permaculture

This weekend, I finished Rosemary Morrow's earth user's guide to permaculture, 2d ed., (Chelsea Green Pub. Co. 2006). The book is written in clear sentences. I really liked Rob Allsop's illustrations.

The book has five sections:
  1. Observing;
  2. Ecological;
  3. Applying;
  4. Resilience; and 
  5. Social.
Each section has substantial merit and so much meat that it will take review and contemplation to take it in and understand its breadth and scope. The application section by itself is worth buying the book.  

A couple notable chapters were 
  • climates and microclimates (ecological);
  • trees, forests, and windbreaks (ecological)
  • developing your design methods (applying)
  • a chapter each for permaculture zones zero to five (applying)
  • design for disaster (resilience)
  • pest management--IPM (reslience)
  • aquaculture (reslience)
The book tends to devolve slightly into political environmentalism from a governmental perspective.  I am not sure how the authors would feel about individual liberty philosophy. Clearly, that is a trait that many permaculturists exhibit. That said, the political crap is definitely a far-backseat to the practical principles that Morrow clearly explains in her excellent book 

Now I just need to apply some of the stuff I learned.  

Monday, January 21, 2013

DIY Rain Catchment with 55 Gallon Barrels

I built a small, experimental water catchment system for the north side of my garage using 55 gallon barrels and pvc pipe.  If it works, it has the capability of holding around 150 gallons.  I will need to drain it before each new rain event or it will likely overflow.

The interesting element of this project is the use of upside down barrels.  The piping is introduced into the female bung screw holes with male adapters. The barrels are flipped over so the top is underneath the system.

The standard 55 gallon barrel has a bung cap that screws into threads in the barrel.  The key to this system is the male pvc pipe adapter and slip.  The entire system is mostly closed with minimal drilling into the barrel except for two places--the ingress and egress overflow points of the system. Here, for example, I created the small catchment system for our garage roof. My north-edge plastic gutters drain into the first barrel which gravity fills through the pvc piping into the other barrels.  Here is how I made the system using mostly 2 inch pvc parts.

First, remove the bung nut.  You can then insert the male threaded pvc adapter with slip into the hole and screw it down.  I used plumbing tape over the threads of the adapter to discourage leaks. This adapter creates a nice seal and the slip piece allows us to attach the other plumbing.

Cut 4-inch short pieces of pvc pipe for the top of each barrel.  Cut the pieces of pipe at a 90 degree angle, smoothly cut.  Use pvc primer and solvent to connect and set up a good seal between the pipe and adapter. When done, you have an adapter screwed into the bung hole with a short piece of pipe sticking up out of it.

Connect your other fittings to the end of the pipe that emerges from the top of the adapter. For this three-barrel system, from left to right, I installed one 90 degree and two T-joints.  You need more T-joints if you want to link additional barrels.

You will set the barrels up on something solid like concrete blocks.  Level the blocks out.  You should aim to place each barrel slightly higher so that the last barrel is the highest.  However, you do not want the last barrel so high that your system overflows at the ingress point. If you get this right, gravity forces the water to fill most of barrels full before water overflows from the third barrel's overflow pipe.  I will get to that in a bit.

Flip all the barrels upside down and organize them on the blocks so the pipe joints are lined up.  Measure and cut pieces of pvc pipe so each barrel is linked underneath by 2 inch pvc pipe.  Use the primer/solvent to set up a good seal for the pvc pipe between each joint.

The last barrel T-joint has a 3/4 inch bushing at the end.  Into this bushing, one can screw a faucet.  This allows you to drain the barrels in times of drought.

You can improve on my design by extending pvc pipe from the last T-joint before installing the bushing. You  might need a 2x2 coupling to do this.  The design improvement will give you more space to make your drain hose connection.

The top of the last barrel must have an overflow outlet.  This is a pretty small system. In a heavy rain, a roof the size of my garage (around 500 square feet) can fill the three little barrels in about 15 minutes.

For the ingress hole in the first barrel, use a 2 3/8 hole cutting bit on your drill to cut a hole in the top of the upside-down barrel.  Attach a 18 inch  pipe to a 2 x 4 inch coupling.  Stick the pipe end down the hole.  It should fit pretty snuggly.  The 4" coupling is big enough so your gutter downspout will fit into the top of the coupling.

The overflow system is similarly engineered.  Cut the 2 3/8 inch hole near the top outside end of your last upside down barrel.  My current overflow system is still a work in progress.  I will update this later when I get it figured out better.

For now, I temporarily rigged my overflow pipe with a 6 inch piece of pvc pipe connected to a 3x2 coupling.  I connected the pipe to the coupling and stuck it into the hole.  The overflow comes out the coupling and spills onto a brick next to the barrel.  However, the seal and overflow system is inadequate.  Moreover, the spill does not go where I want it to go.

I will figure out how I can put some kind of rubber washer between the coupling and the barrel so leakage will be reduced.  Unless I figure out something better, I will connect a 3" pipe, a 90 degree joint, 3" pipe, 3x2 coupling, 2" pipe, 90 degree joint, 2" pipe, 2 x 3/4 bushing, drain hose.

Eventually, my plan will connect my drain pipe together using a hose Y connection.  The drain hose goes down hill to a swale at the top of our western planned orchard.

Watch this post for updates when I figure out the parts for the overflow and drainage elements.

The parts for the project (all 2 inch pvc) were as follows:


  • Barrel Plumbing Connections

  1. 2" pipe; 
  2. 3x male threaded adapters and slips;
  3. 90 degree joint;
  4. 2x T joints;
  5. 2 inch to 3/4 inch female bushing;
  6. 3/4 inch Faucet
  7. drain hose;
  • Ingress Connection
  1. 2 x 4 inch coupling;
  2. 2" pipe
  • Overflow Connection
  1. 2 inch pvc pipe
  2. 3 inch pvc pipe
  3. 2 x 3 inch coupling
  4. 3 inch 90 degree joint
  5. 3 x 2 coupling
  6. 90 degree joint
  7. 2 x 3/4 female bushing 
  8. 3/4 inch faucet;
  9. drain hose

Friday, January 18, 2013

North Carolina Bee Laws Impact Hive Choice

I am starting two bee hives this spring. I've been doing a lot of thinking about the Warre' bee hives, and decided to start my bees in two types of hives.  Here is my rational.

I still like the idea of natural beekeeping with a Warre' hive.  The absence of work is certainly an appealing aspect.  However, the fact is that North Carolina laws discourage use of Warre'.  If we intended to be just a hobby beekeeper, then the Warre' is no problem. However, I don't like giving up flexibility because of the North Carolina beekeeping laws.  Who knows, maybe in the future we might want to explore the commercial aspects?  If there is any real interest, maybe it would be a good livelihood for Jackson?  There could be tax advantages for our family.

Besides, if we were to go into a commercial venture with bees, we are well-positioned.  We intend to raise natural, small-cell bees mixed with ferel stock.  Ferel bees are thougth to be survivors.  They are the colonies that survived mites, beetles, and bears. By natural selection, they fight attacks on the hives more effectively.  Small cell bees, likewise, because of their small stature, are possibly more resistent to parasites.  Combined, the two genetic lines of bees should be strong.  Tryon bees could be marketable.

From a small business standpoint, an investor who has a feel for the movements in the country has an advantage.  I believe there is now a small but growing movement in America in the direction of sustainable, small-scale practices in agriculture, and also toward a more naturally-focused health care system.  Bees will be a part of both of those related movements.  There is going to be a market for bees to natural beekeepers.  There is a growing market for the healthy, chemical-free byproducts produced by bees.

The North Carolina State law prohibits sale of bees without state certification.  You cannot get the certification unless the hives are inspected.  The policy is to insure that North Carolina bee vendors are not selling diseased bees and spreading stuff like American foul brood.  Therefore, to go into the bee selling business you need state certification following an apiary inspection.

Completing inspection of brood cells in aWarre' hive could not be done unless you tore apart the hive.  The standard Warre' hives are designed to stay connected except to add more space or harvest.  You cannot easily pull out brood frames for inspection with a standard Warre' hive. Consequently, if we just have Warre' hives we will be unable to obtain state certification.

Therefore, we are buying one Langstroth hive.  Langstroth is the standard hive with the removable frames.

There are still a lot of options within the Langstroth hive choices.  Primarily, so the hive is esI am choosing the 8-frame medium boxes.  These are lighter than the ten frame varieties.  Medium boxes are smaller than the deep boxes.

I also will start these hives with foundationless frames.  I could use plastic frames, but I am not sure I want plastic in my hive because of our aim for natural beekeeping.

I could use wax comb foundations, but the wax could come from hives where bees were chemically treated. This introduces chemicals into my hives through the wax.  I am using wax starter strips.  This wax may have been chemically treated, but most of the comb will be drawn out by the bees.  I figure the chemical threat is minimal.  Over time, as our natural wax comb is incorporated, the chemical inputs will diminish further.

My bee jacket, veil, hive tool, and smoker arrived by package yesterday.  I ordered the unassembled, Langstroth hive shown above today from Brushy Mountain Bee Farm.

Thursday, January 17, 2013

Warre Hive Construction

This post journals my efforts to build a Warre' Hive.  I am using the online guide at The Bee Space.

Yesterday, January 12, I began acquiring materials for the build.  These include the following:

  1. (1) 1″x12″ pine shelving 
  2. (3) 1 x 10" pine shelving (total 30 - 60 board feet p/hive)
  3. (1) 14″x14″ 3/8 inch plywood
  4. Flathead wood screws, guage 4 or 5, length 2 inches; 
  5. 5d galvanized nails (pins for bars; barely longer than the 3/8" thick top bar)
  6. 4.5 to 5 square feet of cloth (or 1.5 yards of canvas when cut from a 60″ roll)
  7. Linseed Oil
Couple notes on the materials.  First, the size of the Warre' boxes are 210 mm (about 8 1/4 inches) tall. Therefore, the 12" shelving recommended is a bit long so there maybe some scrap wood. 

Second, it looks like I will need a table saw or router to cut the bevel for the top of the boxes in the hive, or I will need to cut the rebate with a circular saw. This bevel is on two opposite sides and is where the top bars are placed.  I don't have a table saw or router so the circular saw is the tool of choice.  

January 17: Over the past few days, I tryed to hone in on some of the practical decisions associated with the first two Warre' hive builds. 

Frames: The Warre' hive construction above does not contain foundationless frames, only the top bars.  The disadvantage of building the hive with only top bars is that it is much more difficult to inspect. 

In North Carolina, if we at our homestead ever progress with beekeeping to the point of selling bees, we would need to obtain a state certification. This is only issued after a hive inspection. Thus, a lack of frames would impede the needed steps needed for certification.  

Frames take up additional space in the cavity of the hive. Thus, frames in a Warre' argue for enlarging the dimensions of the hive body by a few inches in all directions to accommodate the frames.  

One solution would be to build slightly larger Warre' hives than the specs suggest.  Later, should we decide to introduce frames into these two hives, we could do so.

Alternatively, we could just build these standard.  If expanding our beekeeping is later advisable for our homestead considering the potential bee predators (skunks, european hornets) here, then we could make all the new hives modified Warre' hives or build medium Langs.  Considering everything, at this point, we are going to use the standard dimensions for these first hives.

Screened Bottom Board: The guide above uses a solid bottom board.  There are two disadvantages.  One, the possibility of verroa mite infection is increased with a bottom board because the mites that fall off bees can jump onboard a new host.  Second, it is impossible to see what is happening in the hive.  Without the screened bottom board, your evaluation of colony growth is limited to the density of bees at the front entrance of the hive.  With a screened bottom board, one can crawl underneath and peer up and into the hive to see if the bees are building comb in the bottom hive box.  

Some argue that Warre' did not include a screened bottom board in his design because of the environmental impacts.   Wind might displace the warm air in the hive. Others argue that the wind cannot displace the warm air because of the quilt.  Moreover, since heat rises, the relatively colder air underneath also will not displace the warm air by convection.  

Considering all elements, I will try to use a screened bottom board.  This link shows how one person designed it.  


Sunday, January 13, 2013

Front Porch Project

Started the front porch project this afternoon.  The project is carpentry-oriented.  The existing concrete porch is perfectly level.  This causes water to pool on the concrete and run down a crack at the joint between the porch and the wood outside the house.

The porch is built on cinderblocks.  There is one window that leads through to a root cellar dug out under the porch and connected to the basement.  If we can get it dry and ventalated, the root cellar should be real nice for storing food, wine, beer, etc.

The current state of the concrete is crumbling.  The edges of the pad, which is four inches thick, are breaking off.  It is possible water is actually penetrating through cracks; although I suspect the incursion is due to the water running through the joint and accross the ceiling.

First order of business is repair of the wood at the joint of the existing pad and the house.  I will pull off the facie boards and see about shoring up any rotten wood inside the house.

Second, repair the concrete pad.  I intend to pour new concrete over the existing pad and make sure that the water runs down and away from the foundation.

Third, I will build posts and make a small simple porch.

Today, I measured and cut three boards.  These will be used to frame up the pad.  I left a little space between the edges and pad (assuming correct measurements).  When I get the concrete, I will start on ripping out the facie boards, checking out the carpentry work inside that needs to be done, and then pour new concrete.

Saturday, January 12, 2013

Type One Beekeeping Decision-making

I have been reading and listening to podcasts about beekeeping now for several weeks.  The podcast I have found most useful was Craig's the Organically Managed Beekeeping Podcast and Forums.  This post summarizes some of what I have learned, and explains why I am heading in the direction of natural beekeeping.  Please bear in mind that I am a total novice with no beekeeping experience whatsoever. Take these thoughts from one just sticking his toe in the beekeeping water.

The Type of Hive


From my research, I have learned that there are several dramatically different styles of hives.  Which style you choose determines the mechanics of taking care of the bees.  Depending on your choice, many beekeeping skills and practices are dissimilar.

The Langstroth Hive is the the predominant type in the United States.  Commercial beekeeping practices in the past 100 years gravitated to Langstroff Hives.   Those hives are designed to maximize honey production.  With the use of mechanical extractors, the honey harvest can be streamlined and made more efficient.  Langs use frames so that bees do not need to build their own comb.  The theory is that the bees can go right to work inside the Lang frames and that will increase production.

One advantage of Langs is that you have standardization.  Most beekeepers in America use Langs so the hive equipment is readily available.  Also, you have more mentors about with experience.  If you join a local beekeeping club, you will meet mostly people working Langstroth hives.

On the other hand, an older style of beekeeping is the more-natural style, top bar hives.  This top bar beekeeping practice forces the bees to build their own comb.  The bees build comb down from the top bars.  With the top bar style, extractors are not generally used to harvest honey.  The general consensus is that the honey harvest using top bar beekeeping is smaller.

One advantage of the top bar style of beekeeping is that the costs to build a hive are lower.  Primarily, this is because you do not need the expense of frames (which last only two or three years).  Also, mechanical extractors, which are expensive, are not used to harvest.  Instead, top bar beekeepers use a technique called crush and strain.

There are several types of top bar beehives.  The most common types are the Kenyan anTanzanian top bar hives. Both of these type hives (which are shaped differently) are horizontal top bar hives.  The bees create comb in half the top bar hive. As the hive grows, the beekeeper removes some wood to open up the other parts of the hive.

A disadvantage with horizontal top bar hives arises when the beekeeper is not diligent in checking on the bees.  Remember the bees build their own comb.  If the beekeeper is not diligent in directing the build, you can get something called crazy comb.  This makes harvesting honey quite problematic.

Another top bar hive is the Warre' Hive.  This is a vertical top bar hive.  It was conceived by a French researcher named Abbe' Warre' who in 1948 wrote a 12th edition of Beekeeping for All.  In this book, which is full of research about bees in general, Warre' describes in detail how to build The People's Hive, which is what he called the vertical top bar hive.

The Warre' Hive has an advantage over other top bar hives in that there is less management needed from the beekeeper.  Additionally, the building of comb vertically is more naturally akin to what bees would do in the wild.  Thus, the top bar hive seeks to manipulate the bees to encourage horizontal development of comb.  This manipulation is not unlike the Langstroth effort to force bees to build hives using the uniform, pre-made frames.

The Style of Beekeeping

A second consideration with regard to beekeeping is how the beekeeper intends to protect the bees from pests.

There are many critters that can attack a hive and cause it damage.  These include mites, beetles, and mice.  Many American beekeepers now use chemicals to combat these pests.  They have been told by the chemical companies that these chemicals are effective and perfectly safe.

However, you have to make up your own mind about whether you believe the research, including research of government.  I personally consider it mostly propaganda.

Therefore, my style gravitates to natural beekeeping. There are a minority of beekeepers who do not treat their hives with chemicals.  They use genetics to breed bees strong enough to naturally defeat the preditors.  Some use essential oils to help the bees.  Some do not.

The selective breeding and use of natural selection has allowed some natural beekeepers to breed a smaller bee.  This bee is called the "small cell" bee.  In theory, a small cell bee is better able to defeat some of the mites.

The small cell bee is also the more historically natural bee.  About 100 years ago, people began selectively breeding a larger bee.  The small cell bee is a bee that is decreasing in size, rebounding to the size of its historical ancestror.

Conclusion

I am making Type 1 decisions here.  They are consistent with sustainable practices.  They are consistent with principles of permaculture.  


Thursday, January 3, 2013

Earthworks Design and Water Conservation Drawing


The drawing above shows our planning for installing three cisterns, and building earthworks, two rain gardens, and a pond.  The drawing also indicates the location of water slowing devices located along a ditch forming down the south side of our gravel driveway.  The contour runs generally southward.  The house is located at the top of the hill.

According to the Technical Guidance: Stormwater Treatment Credit for Rainwater Harvesting, we will need cisterns about the house capable of handling 3,000 gallons of 24-hour water flow (1 year).  This is based on government's 1 Year 24 Hour Storm Rainfall in Tryon, 3.93 inches. (See National Oceanic and Atmospheric Administration of the United States Dept. of Commerce, National Weather Service, NOAA ATLAS 14 POINT PRECIPITATION FREQUENCY ESTIMATES: (Tryon, North Carolina, US (31-8744)).

My calculations are located at this link.