Thursday, January 31, 2013

Shiitake Cultivation Planning

Maximizing Your "Mycelial Mileage", published at Fungi.com, has some interesting thoughts on mushroom cultivation.

My cultivation will be outdoors on oak logs.  Figuring out the best technique and location are in the cards.  One item in this article that jumps out is the recommendation to cut logs one to three months before innoculation.  Trees emit a natural anti-fungal substance soon after cutting.  This means I need to trim up my white oak so the branches can begin to calm down in preparation for innoculation later this year, in the spring.


The video below, issued by the UK Forestry Department, has a fair amount of technical information about shiitake cultivation.

Wednesday, January 23, 2013

NC State: BEES System Low-Cost Education

NC State offers low-cost education for beekeepers through the BEES System.  This looks like an excellent educational opportunity.  It's $25 for each course.  The beginner beekeeping program costs a total of $75.  If you pass the NC State test, the university will issue a electronic BEES Certificate of Completion.


Tuesday, January 22, 2013

Earth Users Guide to Permaculture

This weekend, I finished Rosemary Morrow's earth user's guide to permaculture, 2d ed., (Chelsea Green Pub. Co. 2006). The book is written in clear sentences. I really liked Rob Allsop's illustrations.

The book has five sections:
  1. Observing;
  2. Ecological;
  3. Applying;
  4. Resilience; and 
  5. Social.
Each section has substantial merit and so much meat that it will take review and contemplation to take it in and understand its breadth and scope. The application section by itself is worth buying the book.  

A couple notable chapters were 
  • climates and microclimates (ecological);
  • trees, forests, and windbreaks (ecological)
  • developing your design methods (applying)
  • a chapter each for permaculture zones zero to five (applying)
  • design for disaster (resilience)
  • pest management--IPM (reslience)
  • aquaculture (reslience)
The book tends to devolve slightly into political environmentalism from a governmental perspective.  I am not sure how the authors would feel about individual liberty philosophy. Clearly, that is a trait that many permaculturists exhibit. That said, the political crap is definitely a far-backseat to the practical principles that Morrow clearly explains in her excellent book 

Now I just need to apply some of the stuff I learned.  

Monday, January 21, 2013

DIY Rain Catchment with 55 Gallon Barrels

I built a small, experimental water catchment system for the north side of my garage using 55 gallon barrels and pvc pipe.  If it works, it has the capability of holding around 150 gallons.  I will need to drain it before each new rain event or it will likely overflow.

The interesting element of this project is the use of upside down barrels.  The piping is introduced into the female bung screw holes with male adapters. The barrels are flipped over so the top is underneath the system.

The standard 55 gallon barrel has a bung cap that screws into threads in the barrel.  The key to this system is the male pvc pipe adapter and slip.  The entire system is mostly closed with minimal drilling into the barrel except for two places--the ingress and egress overflow points of the system. Here, for example, I created the small catchment system for our garage roof. My north-edge plastic gutters drain into the first barrel which gravity fills through the pvc piping into the other barrels.  Here is how I made the system using mostly 2 inch pvc parts.

First, remove the bung nut.  You can then insert the male threaded pvc adapter with slip into the hole and screw it down.  I used plumbing tape over the threads of the adapter to discourage leaks. This adapter creates a nice seal and the slip piece allows us to attach the other plumbing.

Cut 4-inch short pieces of pvc pipe for the top of each barrel.  Cut the pieces of pipe at a 90 degree angle, smoothly cut.  Use pvc primer and solvent to connect and set up a good seal between the pipe and adapter. When done, you have an adapter screwed into the bung hole with a short piece of pipe sticking up out of it.

Connect your other fittings to the end of the pipe that emerges from the top of the adapter. For this three-barrel system, from left to right, I installed one 90 degree and two T-joints.  You need more T-joints if you want to link additional barrels.

You will set the barrels up on something solid like concrete blocks.  Level the blocks out.  You should aim to place each barrel slightly higher so that the last barrel is the highest.  However, you do not want the last barrel so high that your system overflows at the ingress point. If you get this right, gravity forces the water to fill most of barrels full before water overflows from the third barrel's overflow pipe.  I will get to that in a bit.

Flip all the barrels upside down and organize them on the blocks so the pipe joints are lined up.  Measure and cut pieces of pvc pipe so each barrel is linked underneath by 2 inch pvc pipe.  Use the primer/solvent to set up a good seal for the pvc pipe between each joint.

The last barrel T-joint has a 3/4 inch bushing at the end.  Into this bushing, one can screw a faucet.  This allows you to drain the barrels in times of drought.

You can improve on my design by extending pvc pipe from the last T-joint before installing the bushing. You  might need a 2x2 coupling to do this.  The design improvement will give you more space to make your drain hose connection.

The top of the last barrel must have an overflow outlet.  This is a pretty small system. In a heavy rain, a roof the size of my garage (around 500 square feet) can fill the three little barrels in about 15 minutes.

For the ingress hole in the first barrel, use a 2 3/8 hole cutting bit on your drill to cut a hole in the top of the upside-down barrel.  Attach a 18 inch  pipe to a 2 x 4 inch coupling.  Stick the pipe end down the hole.  It should fit pretty snuggly.  The 4" coupling is big enough so your gutter downspout will fit into the top of the coupling.

The overflow system is similarly engineered.  Cut the 2 3/8 inch hole near the top outside end of your last upside down barrel.  My current overflow system is still a work in progress.  I will update this later when I get it figured out better.

For now, I temporarily rigged my overflow pipe with a 6 inch piece of pvc pipe connected to a 3x2 coupling.  I connected the pipe to the coupling and stuck it into the hole.  The overflow comes out the coupling and spills onto a brick next to the barrel.  However, the seal and overflow system is inadequate.  Moreover, the spill does not go where I want it to go.

I will figure out how I can put some kind of rubber washer between the coupling and the barrel so leakage will be reduced.  Unless I figure out something better, I will connect a 3" pipe, a 90 degree joint, 3" pipe, 3x2 coupling, 2" pipe, 90 degree joint, 2" pipe, 2 x 3/4 bushing, drain hose.

Eventually, my plan will connect my drain pipe together using a hose Y connection.  The drain hose goes down hill to a swale at the top of our western planned orchard.

Watch this post for updates when I figure out the parts for the overflow and drainage elements.

The parts for the project (all 2 inch pvc) were as follows:


  • Barrel Plumbing Connections

  1. 2" pipe; 
  2. 3x male threaded adapters and slips;
  3. 90 degree joint;
  4. 2x T joints;
  5. 2 inch to 3/4 inch female bushing;
  6. 3/4 inch Faucet
  7. drain hose;
  • Ingress Connection
  1. 2 x 4 inch coupling;
  2. 2" pipe
  • Overflow Connection
  1. 2 inch pvc pipe
  2. 3 inch pvc pipe
  3. 2 x 3 inch coupling
  4. 3 inch 90 degree joint
  5. 3 x 2 coupling
  6. 90 degree joint
  7. 2 x 3/4 female bushing 
  8. 3/4 inch faucet;
  9. drain hose

Friday, January 18, 2013

North Carolina Bee Laws Impact Hive Choice

I am starting two bee hives this spring. I've been doing a lot of thinking about the Warre' bee hives, and decided to start my bees in two types of hives.  Here is my rational.

I still like the idea of natural beekeeping with a Warre' hive.  The absence of work is certainly an appealing aspect.  However, the fact is that North Carolina laws discourage use of Warre'.  If we intended to be just a hobby beekeeper, then the Warre' is no problem. However, I don't like giving up flexibility because of the North Carolina beekeeping laws.  Who knows, maybe in the future we might want to explore the commercial aspects?  If there is any real interest, maybe it would be a good livelihood for Jackson?  There could be tax advantages for our family.

Besides, if we were to go into a commercial venture with bees, we are well-positioned.  We intend to raise natural, small-cell bees mixed with ferel stock.  Ferel bees are thougth to be survivors.  They are the colonies that survived mites, beetles, and bears. By natural selection, they fight attacks on the hives more effectively.  Small cell bees, likewise, because of their small stature, are possibly more resistent to parasites.  Combined, the two genetic lines of bees should be strong.  Tryon bees could be marketable.

From a small business standpoint, an investor who has a feel for the movements in the country has an advantage.  I believe there is now a small but growing movement in America in the direction of sustainable, small-scale practices in agriculture, and also toward a more naturally-focused health care system.  Bees will be a part of both of those related movements.  There is going to be a market for bees to natural beekeepers.  There is a growing market for the healthy, chemical-free byproducts produced by bees.

The North Carolina State law prohibits sale of bees without state certification.  You cannot get the certification unless the hives are inspected.  The policy is to insure that North Carolina bee vendors are not selling diseased bees and spreading stuff like American foul brood.  Therefore, to go into the bee selling business you need state certification following an apiary inspection.

Completing inspection of brood cells in aWarre' hive could not be done unless you tore apart the hive.  The standard Warre' hives are designed to stay connected except to add more space or harvest.  You cannot easily pull out brood frames for inspection with a standard Warre' hive. Consequently, if we just have Warre' hives we will be unable to obtain state certification.

Therefore, we are buying one Langstroth hive.  Langstroth is the standard hive with the removable frames.

There are still a lot of options within the Langstroth hive choices.  Primarily, so the hive is esI am choosing the 8-frame medium boxes.  These are lighter than the ten frame varieties.  Medium boxes are smaller than the deep boxes.

I also will start these hives with foundationless frames.  I could use plastic frames, but I am not sure I want plastic in my hive because of our aim for natural beekeeping.

I could use wax comb foundations, but the wax could come from hives where bees were chemically treated. This introduces chemicals into my hives through the wax.  I am using wax starter strips.  This wax may have been chemically treated, but most of the comb will be drawn out by the bees.  I figure the chemical threat is minimal.  Over time, as our natural wax comb is incorporated, the chemical inputs will diminish further.

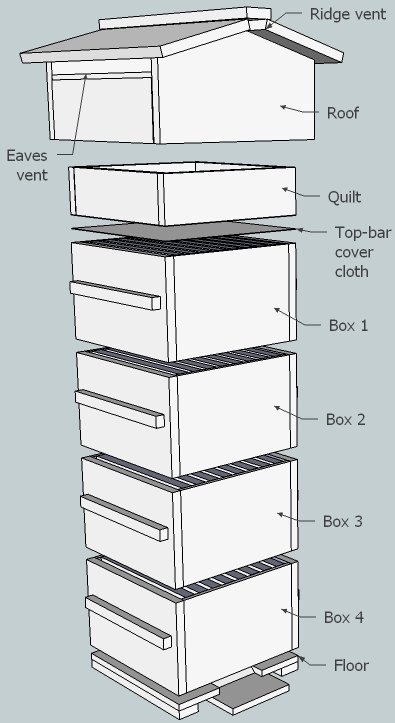
My bee jacket, veil, hive tool, and smoker arrived by package yesterday.  I ordered the unassembled, Langstroth hive shown above today from Brushy Mountain Bee Farm.

Thursday, January 17, 2013

Warre Hive Construction

This post journals my efforts to build a Warre' Hive.  I am using the online guide at The Bee Space.

Yesterday, January 12, I began acquiring materials for the build.  These include the following:

  1. (1) 1″x12″ pine shelving 
  2. (3) 1 x 10" pine shelving (total 30 - 60 board feet p/hive)
  3. (1) 14″x14″ 3/8 inch plywood
  4. Flathead wood screws, guage 4 or 5, length 2 inches; 
  5. 5d galvanized nails (pins for bars; barely longer than the 3/8" thick top bar)
  6. 4.5 to 5 square feet of cloth (or 1.5 yards of canvas when cut from a 60″ roll)
  7. Linseed Oil
Couple notes on the materials.  First, the size of the Warre' boxes are 210 mm (about 8 1/4 inches) tall. Therefore, the 12" shelving recommended is a bit long so there maybe some scrap wood. 

Second, it looks like I will need a table saw or router to cut the bevel for the top of the boxes in the hive, or I will need to cut the rebate with a circular saw. This bevel is on two opposite sides and is where the top bars are placed.  I don't have a table saw or router so the circular saw is the tool of choice.  

January 17: Over the past few days, I tryed to hone in on some of the practical decisions associated with the first two Warre' hive builds. 

Frames: The Warre' hive construction above does not contain foundationless frames, only the top bars.  The disadvantage of building the hive with only top bars is that it is much more difficult to inspect. 

In North Carolina, if we at our homestead ever progress with beekeeping to the point of selling bees, we would need to obtain a state certification. This is only issued after a hive inspection. Thus, a lack of frames would impede the needed steps needed for certification.  

Frames take up additional space in the cavity of the hive. Thus, frames in a Warre' argue for enlarging the dimensions of the hive body by a few inches in all directions to accommodate the frames.  

One solution would be to build slightly larger Warre' hives than the specs suggest.  Later, should we decide to introduce frames into these two hives, we could do so.

Alternatively, we could just build these standard.  If expanding our beekeeping is later advisable for our homestead considering the potential bee predators (skunks, european hornets) here, then we could make all the new hives modified Warre' hives or build medium Langs.  Considering everything, at this point, we are going to use the standard dimensions for these first hives.

Screened Bottom Board: The guide above uses a solid bottom board.  There are two disadvantages.  One, the possibility of verroa mite infection is increased with a bottom board because the mites that fall off bees can jump onboard a new host.  Second, it is impossible to see what is happening in the hive.  Without the screened bottom board, your evaluation of colony growth is limited to the density of bees at the front entrance of the hive.  With a screened bottom board, one can crawl underneath and peer up and into the hive to see if the bees are building comb in the bottom hive box.  

Some argue that Warre' did not include a screened bottom board in his design because of the environmental impacts.   Wind might displace the warm air in the hive. Others argue that the wind cannot displace the warm air because of the quilt.  Moreover, since heat rises, the relatively colder air underneath also will not displace the warm air by convection.  

Considering all elements, I will try to use a screened bottom board.  This link shows how one person designed it.  


Sunday, January 13, 2013

Front Porch Project

Started the front porch project this afternoon.  The project is carpentry-oriented.  The existing concrete porch is perfectly level.  This causes water to pool on the concrete and run down a crack at the joint between the porch and the wood outside the house.

The porch is built on cinderblocks.  There is one window that leads through to a root cellar dug out under the porch and connected to the basement.  If we can get it dry and ventalated, the root cellar should be real nice for storing food, wine, beer, etc.

The current state of the concrete is crumbling.  The edges of the pad, which is four inches thick, are breaking off.  It is possible water is actually penetrating through cracks; although I suspect the incursion is due to the water running through the joint and accross the ceiling.

First order of business is repair of the wood at the joint of the existing pad and the house.  I will pull off the facie boards and see about shoring up any rotten wood inside the house.

Second, repair the concrete pad.  I intend to pour new concrete over the existing pad and make sure that the water runs down and away from the foundation.

Third, I will build posts and make a small simple porch.

Today, I measured and cut three boards.  These will be used to frame up the pad.  I left a little space between the edges and pad (assuming correct measurements).  When I get the concrete, I will start on ripping out the facie boards, checking out the carpentry work inside that needs to be done, and then pour new concrete.

Saturday, January 12, 2013

Type One Beekeeping Decision-making

I have been reading and listening to podcasts about beekeeping now for several weeks.  The podcast I have found most useful was Craig's the Organically Managed Beekeeping Podcast and Forums.  This post summarizes some of what I have learned, and explains why I am heading in the direction of natural beekeeping.  Please bear in mind that I am a total novice with no beekeeping experience whatsoever. Take these thoughts from one just sticking his toe in the beekeeping water.

The Type of Hive


From my research, I have learned that there are several dramatically different styles of hives.  Which style you choose determines the mechanics of taking care of the bees.  Depending on your choice, many beekeeping skills and practices are dissimilar.

The Langstroth Hive is the the predominant type in the United States.  Commercial beekeeping practices in the past 100 years gravitated to Langstroff Hives.   Those hives are designed to maximize honey production.  With the use of mechanical extractors, the honey harvest can be streamlined and made more efficient.  Langs use frames so that bees do not need to build their own comb.  The theory is that the bees can go right to work inside the Lang frames and that will increase production.

One advantage of Langs is that you have standardization.  Most beekeepers in America use Langs so the hive equipment is readily available.  Also, you have more mentors about with experience.  If you join a local beekeeping club, you will meet mostly people working Langstroth hives.

On the other hand, an older style of beekeeping is the more-natural style, top bar hives.  This top bar beekeeping practice forces the bees to build their own comb.  The bees build comb down from the top bars.  With the top bar style, extractors are not generally used to harvest honey.  The general consensus is that the honey harvest using top bar beekeeping is smaller.

One advantage of the top bar style of beekeeping is that the costs to build a hive are lower.  Primarily, this is because you do not need the expense of frames (which last only two or three years).  Also, mechanical extractors, which are expensive, are not used to harvest.  Instead, top bar beekeepers use a technique called crush and strain.

There are several types of top bar beehives.  The most common types are the Kenyan anTanzanian top bar hives. Both of these type hives (which are shaped differently) are horizontal top bar hives.  The bees create comb in half the top bar hive. As the hive grows, the beekeeper removes some wood to open up the other parts of the hive.

A disadvantage with horizontal top bar hives arises when the beekeeper is not diligent in checking on the bees.  Remember the bees build their own comb.  If the beekeeper is not diligent in directing the build, you can get something called crazy comb.  This makes harvesting honey quite problematic.

Another top bar hive is the Warre' Hive.  This is a vertical top bar hive.  It was conceived by a French researcher named Abbe' Warre' who in 1948 wrote a 12th edition of Beekeeping for All.  In this book, which is full of research about bees in general, Warre' describes in detail how to build The People's Hive, which is what he called the vertical top bar hive.

The Warre' Hive has an advantage over other top bar hives in that there is less management needed from the beekeeper.  Additionally, the building of comb vertically is more naturally akin to what bees would do in the wild.  Thus, the top bar hive seeks to manipulate the bees to encourage horizontal development of comb.  This manipulation is not unlike the Langstroth effort to force bees to build hives using the uniform, pre-made frames.

The Style of Beekeeping

A second consideration with regard to beekeeping is how the beekeeper intends to protect the bees from pests.

There are many critters that can attack a hive and cause it damage.  These include mites, beetles, and mice.  Many American beekeepers now use chemicals to combat these pests.  They have been told by the chemical companies that these chemicals are effective and perfectly safe.

However, you have to make up your own mind about whether you believe the research, including research of government.  I personally consider it mostly propaganda.

Therefore, my style gravitates to natural beekeeping. There are a minority of beekeepers who do not treat their hives with chemicals.  They use genetics to breed bees strong enough to naturally defeat the preditors.  Some use essential oils to help the bees.  Some do not.

The selective breeding and use of natural selection has allowed some natural beekeepers to breed a smaller bee.  This bee is called the "small cell" bee.  In theory, a small cell bee is better able to defeat some of the mites.

The small cell bee is also the more historically natural bee.  About 100 years ago, people began selectively breeding a larger bee.  The small cell bee is a bee that is decreasing in size, rebounding to the size of its historical ancestror.

Conclusion

I am making Type 1 decisions here.  They are consistent with sustainable practices.  They are consistent with principles of permaculture.  


Thursday, January 3, 2013

Earthworks Design and Water Conservation Drawing


The drawing above shows our planning for installing three cisterns, and building earthworks, two rain gardens, and a pond.  The drawing also indicates the location of water slowing devices located along a ditch forming down the south side of our gravel driveway.  The contour runs generally southward.  The house is located at the top of the hill.

According to the Technical Guidance: Stormwater Treatment Credit for Rainwater Harvesting, we will need cisterns about the house capable of handling 3,000 gallons of 24-hour water flow (1 year).  This is based on government's 1 Year 24 Hour Storm Rainfall in Tryon, 3.93 inches. (See National Oceanic and Atmospheric Administration of the United States Dept. of Commerce, National Weather Service, NOAA ATLAS 14 POINT PRECIPITATION FREQUENCY ESTIMATES: (Tryon, North Carolina, US (31-8744)).

My calculations are located at this link.