Monday, May 20, 2013

Red Wriggler Compost Bin: Manure See-Saw

I made a red wriggler compost bin for the worms I bought on March 15, 2013. The construction was pretty simple and easy. In early February, before the worms arrived, I just stacked up cinderblocks in the middle of my garden. I added a couple wheelbarrow loads of horse manure. I filled the area to the brim with the manure. We let the manure sit for a few weeks.

When the worms arrived, we put them into the manure-filed bin. Then, I covered it with some thick sheets of cardboard to keep the moisture inside. (I may add some plywood to the roof later this summer as it gets hotter.)

Over the early spring, the level of the manure decreased by about half. That means that over ten weeks, the 2000 starting wrigglers decreased the pile by fifty percent. Once there is nothing left to eat, the worms will die if you do not keep feeding them fresh manure. We did not start with tremendous quantity of red wriggers (relative to some systems). However, we believe (and hope) the wriggers are multiplying so this process should accelerate as their population gets larger and larger.

I shoveled the half-eaten manure from the eastern side of the bin to the west side. In the picture above, you can see what it looks like sloughed off to one side.

I went out to our horse pasture and gathered a barrow full of fresh manure. Then, I carted it up to the garden and dumped it into the once empty half of the bin. I still need to add one more barrow full of fresh manure. I covered the bin back with cardboard until I bring up the next load.

The wrigglers cannot eat the fresh manure. It is too hot for them, so they will safely stay over in the west side munching away on that stuff. Once that stuff is depleted, the wrigglers will migrate over to the east side that has the fresh manure and start munching away.

At that point, the plan is to harvest the castings from the west side and spread it into the raised beds and gardens for our plants.  What goes into the empty western side of the bin at that point?  You guessed it.  More fresh horse manure.

It is a worm manure see-saw.

Monday, May 13, 2013

Handling our Bucklings Situation


Our twin bucklings are about five weeks old now and they are very healthy young goats. The scabs on their head is from the disbudding procedure described earlier on this blog here.

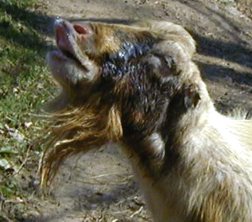
We do not want to have bucks. Bucks are nice if you want to start a herd, but we would like to keep our goat herd small. Plus, as suggested by the picture to the right, Bucks have some goat characteristics that we prefer to avoid. The picture shows a buck peeing on his own face. The upper lip is protruding so he can maximize the taste and smell the goat urine. The propensity to pee on one's own face, is probably one of the least offensive qualities of a buck.

We would like at least one or two more does, but God did not give us any this year. We are blessed with our bucklings, who we have named Johnny Bench (yellow collar) and Garcia (red collar). (I tell them apart because Johnny Bench has coloring on his forelegs that looks like shin guards.)

The video above was shot on Saturday, May 11, 2013, the day after we undertook the neutering procedure. Neutered goats are called "whethers."

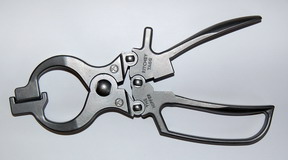
We opted to emasculate our goats with a burdizzo. FIASCO farm has a detailed description on how to undertake neutering male goats with a burdizzo here. We used a Richey Nipper tool (see left).

As recommended, we gave the young goats a tincture called Ow-Eezz to prepare them before we undertook the process. The process itself did not take long, only about five minutes per goat. The young goats were pretty sore for about two hours afterwards. The next morning, they were up and jumping around as normal. As you can tell if you watch the video, they are forgiving creatures.

Tuesday, May 7, 2013

Bee Hive Update

On May 2, 2013, I added a honey super, quilt, and roof to the bee hive. The picture to the left shows the construction of my first hive.

Starting with the top down, this posts discusses the new parts and the thinking behind them.

The telescoping roof was made with pine boards.  I tested it and it appears water tight.  The roof fits over top of the quilt.

The quilt is made from a medium narrow super.  I stapled burlap to the bottom of the empty box. Then, I filled it up with some alfalfa hay and pine shavings to about 1/2.   This is an insulation layer for the bees.  Hopefully, it will keep the hive cooler.  The idea is based on Warre' Hive design.

The last new piece was the medium super.  Like the bottom two hive bodies, it is full of foundationaless frames.  They do have starter strips of wax.  I glued them into the grooves of the frame top bars and tacked them down with a couple finishing nails.

I have another medium super that I will add eventually.  Don the Fat Bee Man does not recommend that you put too much empty space into a hive or it will demoralize the bees and set them back.

I also removed a plastic sheet that slid under the screened bottom board.  With spring having sprung, I don't think we are going to have anymore freezing nights.

All the new hive parts, like the old, are treated with linseed oil.  I used green spray paint on the roof for a little color and to match our house.

When I opened the hive, I discovered the bees had started building four combs in the second hive body.  The comb was white and empty except for bees crawling on it.  It is encouraging that the bees were already working hard on filling the second hive body box with drawn comb.  The drawn comb was beautiful.  I'm glad I didn't mar the bees work with foundation.

Note, some of the wax starter strips on the top bars in the second hive body were dangling down into the hive body.  I figure the bees will work around those.  Hopefully, the comb will keep going on straight.  I glued the starter strips to the top bars of the medium super so maybe it will hold this time.