Yesterday, January 12, I began acquiring materials for the build. These include the following:
- (1) 1″x12″ pine shelving
- (3) 1 x 10" pine shelving (total 30 - 60 board feet p/hive)
- (1) 14″x14″ 3/8 inch plywood
- Flathead wood screws, guage 4 or 5, length 2 inches;
- 5d galvanized nails (pins for bars; barely longer than the 3/8" thick top bar)
- 4.5 to 5 square feet of cloth (or 1.5 yards of canvas when cut from a 60″ roll)
- Linseed Oil
 Couple notes on the materials. First, the size of the Warre' boxes are 210 mm (about 8 1/4 inches) tall. Therefore, the 12" shelving recommended is a bit long so there maybe some scrap wood.
Second, it looks like I will need a table saw or router to cut the bevel for the top of the boxes in the hive, or I will need to cut the rebate with a circular saw. This bevel is on two opposite sides and is where the top bars are placed. I don't have a table saw or router so the circular saw is the tool of choice.
January 17: Over the past few days, I tryed to hone in on some of the practical decisions associated with the first two Warre' hive builds.
Frames: The Warre' hive construction above does not contain foundationless frames, only the top bars. The disadvantage of building the hive with only top bars is that it is much more difficult to inspect.
In North Carolina, if we at our homestead ever progress with beekeeping to the point of selling bees, we would need to obtain a state certification. This is only issued after a hive inspection. Thus, a lack of frames would impede the needed steps needed for certification.
Frames take up additional space in the cavity of the hive. Thus, frames in a Warre' argue for enlarging the dimensions of the hive body by a few inches in all directions to accommodate the frames.
One solution would be to build slightly larger Warre' hives than the specs suggest. Later, should we decide to introduce frames into these two hives, we could do so.
Alternatively, we could just build these standard. If expanding our beekeeping is later advisable for our homestead considering the potential bee predators (skunks, european hornets) here, then we could make all the new hives modified Warre' hives or build medium Langs. Considering everything, at this point, we are going to use the standard dimensions for these first hives.
Screened Bottom Board: The guide above uses a solid bottom board. There are two disadvantages. One, the possibility of verroa mite infection is increased with a bottom board because the mites that fall off bees can jump onboard a new host. Second, it is impossible to see what is happening in the hive. Without the screened bottom board, your evaluation of colony growth is limited to the density of bees at the front entrance of the hive. With a screened bottom board, one can crawl underneath and peer up and into the hive to see if the bees are building comb in the bottom hive box.
Some argue that Warre' did not include a screened bottom board in his design because of the environmental impacts. Wind might displace the warm air in the hive. Others argue that the wind cannot displace the warm air because of the quilt. Moreover, since heat rises, the relatively colder air underneath also will not displace the warm air by convection.
Considering all elements, I will try to use a screened bottom board. This link shows how one person designed it.
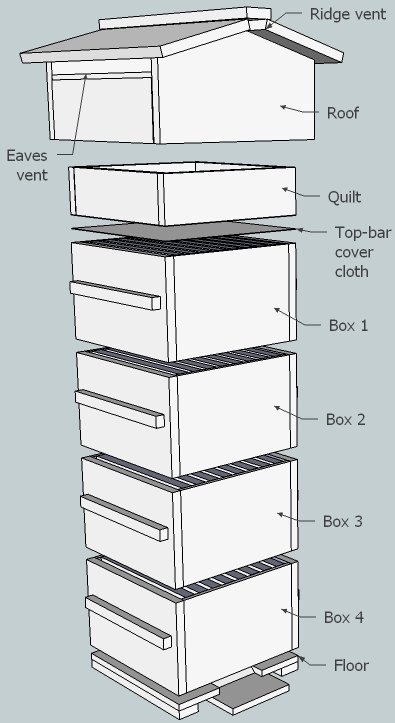
January 17: Over the past few days, I tryed to hone in on some of the practical decisions associated with the first two Warre' hive builds.
Frames: The Warre' hive construction above does not contain foundationless frames, only the top bars. The disadvantage of building the hive with only top bars is that it is much more difficult to inspect.
In North Carolina, if we at our homestead ever progress with beekeeping to the point of selling bees, we would need to obtain a state certification. This is only issued after a hive inspection. Thus, a lack of frames would impede the needed steps needed for certification.
Frames take up additional space in the cavity of the hive. Thus, frames in a Warre' argue for enlarging the dimensions of the hive body by a few inches in all directions to accommodate the frames.
One solution would be to build slightly larger Warre' hives than the specs suggest. Later, should we decide to introduce frames into these two hives, we could do so.
Alternatively, we could just build these standard. If expanding our beekeeping is later advisable for our homestead considering the potential bee predators (skunks, european hornets) here, then we could make all the new hives modified Warre' hives or build medium Langs. Considering everything, at this point, we are going to use the standard dimensions for these first hives.
Screened Bottom Board: The guide above uses a solid bottom board. There are two disadvantages. One, the possibility of verroa mite infection is increased with a bottom board because the mites that fall off bees can jump onboard a new host. Second, it is impossible to see what is happening in the hive. Without the screened bottom board, your evaluation of colony growth is limited to the density of bees at the front entrance of the hive. With a screened bottom board, one can crawl underneath and peer up and into the hive to see if the bees are building comb in the bottom hive box.
Some argue that Warre' did not include a screened bottom board in his design because of the environmental impacts. Wind might displace the warm air in the hive. Others argue that the wind cannot displace the warm air because of the quilt. Moreover, since heat rises, the relatively colder air underneath also will not displace the warm air by convection.
Considering all elements, I will try to use a screened bottom board. This link shows how one person designed it.


