Thursday, July 4, 2013

Berkley Method of Composting in 18 Days

I watched Geoff Lawton's instructions on a basic composting system.  This post summarizes the method Geoff described, which was a modified Berkley method.

First, your goal is to obtain a carbon:nitrogen ratio of between 25 to 30 parts carbon to one part nitrogen. The ingredients of your compost pile vary in richness of nitrogen.  A detailed table is at the link in this sentence.

Your pile ought to be at least 1 M cubed (about five feet).  Do not exceed 1.5M or you may compress the bottom of the pile and encourage anaerobic compost organisms.  Make the pile longer instead of higher.

Cover the pile to keep rain out of it.  You do not want to put the tarp or cover directly on the hot compost or you will encourage anaerobic organisms where the tarp touches the pile. Put branches or something on top to lift the tarp off the top of the pile.

The ingredient mix to achieve the right C:N ratio is approximately 1/3 high carbon (wood shavings, etc.), 1/3 green material, and 1/3 high nitrogen.  These ingredients are thoroughly mixed together.

Mix this together into a pile.  Use a long handled, three to five pronged pitchfork to manage the pile.  Use a rake to smooth it out.

At the beginning, you may use an activator in the middle of the pile.  That could be a dead animal, dead fish, chopped up comfrey or plant with lots of mineral content, or old good compost.  You do not need the activator, but it will help to speed up the process.

At day 4, turn the pile over.  Turn it again every other day thereafter until day 18.

All along you need to keep the moisture content approximately correct.  Geoff recommends a squeeze test.  You grab a big handful of compost and squeeze it tightly in your hands.  If you can get a single droplet to fall out, then it is the right moisture level.  If you can almost get a drop, it is ok.  If it dribbles a lot of drops, it is too moist.

Also, you must periodically test the temperature.  Unless you have a thermometer, you can do this by sticking your arm into the pile.  The temperature should be between 50 - 70 degrees C, but try to keep the temperature between 55-65 degreesC.

At day six, you need to test the compost.  If it is not hot enough, then something is wrong.  Here are the questions:

  1. Is it big enough?
  2. Is it too wet/dry?
  3. Is the mixture right?
You test the heat by sticking your arm into the pile toward the middle.  At 50 degrees C the pile will be uncomfortably hot.  70 degrees will burn and you will be unable to get you arm into the pile.  This is good. The temperature means that the compost is working hard.

If the pile gets too hot, then you will see a white powder developing on the pile.  That is a sign of anaerobic activity.  You need to cool it down some.

If something has gone wrong, you will need to add days lost until the compost is finished.

In the end, hopefully at day 18, smell the compost. It should be earthy smelling and not noxious.  It should be fine. It should be dark brown.  This material is full of beneficial soil life.  You may use it to make compost tea.

Different plants like different flavors of compost.  Trees like fungal rich compost.  Vegitables like bacterial rich compost.  You can mix into the compost different elements to encourage these preferences within a pile after it is done.

Geoff says flour makes a great addition to encourage fungal growth.  Mix into the pile three kilos of flour.  The fungal net will grow rapidly over ten days and then you have compost that is great for planting trees.


Monday, May 20, 2013

Red Wriggler Compost Bin: Manure See-Saw

I made a red wriggler compost bin for the worms I bought on March 15, 2013. The construction was pretty simple and easy. In early February, before the worms arrived, I just stacked up cinderblocks in the middle of my garden. I added a couple wheelbarrow loads of horse manure. I filled the area to the brim with the manure. We let the manure sit for a few weeks.

When the worms arrived, we put them into the manure-filed bin. Then, I covered it with some thick sheets of cardboard to keep the moisture inside. (I may add some plywood to the roof later this summer as it gets hotter.)

Over the early spring, the level of the manure decreased by about half. That means that over ten weeks, the 2000 starting wrigglers decreased the pile by fifty percent. Once there is nothing left to eat, the worms will die if you do not keep feeding them fresh manure. We did not start with tremendous quantity of red wriggers (relative to some systems). However, we believe (and hope) the wriggers are multiplying so this process should accelerate as their population gets larger and larger.

I shoveled the half-eaten manure from the eastern side of the bin to the west side. In the picture above, you can see what it looks like sloughed off to one side.

I went out to our horse pasture and gathered a barrow full of fresh manure. Then, I carted it up to the garden and dumped it into the once empty half of the bin. I still need to add one more barrow full of fresh manure. I covered the bin back with cardboard until I bring up the next load.

The wrigglers cannot eat the fresh manure. It is too hot for them, so they will safely stay over in the west side munching away on that stuff. Once that stuff is depleted, the wrigglers will migrate over to the east side that has the fresh manure and start munching away.

At that point, the plan is to harvest the castings from the west side and spread it into the raised beds and gardens for our plants.  What goes into the empty western side of the bin at that point?  You guessed it.  More fresh horse manure.

It is a worm manure see-saw.

Monday, May 13, 2013

Handling our Bucklings Situation


Our twin bucklings are about five weeks old now and they are very healthy young goats. The scabs on their head is from the disbudding procedure described earlier on this blog here.

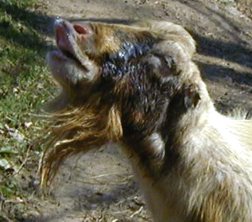
We do not want to have bucks. Bucks are nice if you want to start a herd, but we would like to keep our goat herd small. Plus, as suggested by the picture to the right, Bucks have some goat characteristics that we prefer to avoid. The picture shows a buck peeing on his own face. The upper lip is protruding so he can maximize the taste and smell the goat urine. The propensity to pee on one's own face, is probably one of the least offensive qualities of a buck.

We would like at least one or two more does, but God did not give us any this year. We are blessed with our bucklings, who we have named Johnny Bench (yellow collar) and Garcia (red collar). (I tell them apart because Johnny Bench has coloring on his forelegs that looks like shin guards.)

The video above was shot on Saturday, May 11, 2013, the day after we undertook the neutering procedure. Neutered goats are called "whethers."

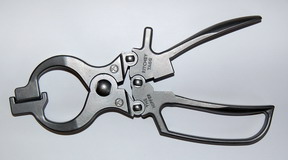
We opted to emasculate our goats with a burdizzo. FIASCO farm has a detailed description on how to undertake neutering male goats with a burdizzo here. We used a Richey Nipper tool (see left).

As recommended, we gave the young goats a tincture called Ow-Eezz to prepare them before we undertook the process. The process itself did not take long, only about five minutes per goat. The young goats were pretty sore for about two hours afterwards. The next morning, they were up and jumping around as normal. As you can tell if you watch the video, they are forgiving creatures.

Tuesday, May 7, 2013

Bee Hive Update

On May 2, 2013, I added a honey super, quilt, and roof to the bee hive. The picture to the left shows the construction of my first hive.

Starting with the top down, this posts discusses the new parts and the thinking behind them.

The telescoping roof was made with pine boards.  I tested it and it appears water tight.  The roof fits over top of the quilt.

The quilt is made from a medium narrow super.  I stapled burlap to the bottom of the empty box. Then, I filled it up with some alfalfa hay and pine shavings to about 1/2.   This is an insulation layer for the bees.  Hopefully, it will keep the hive cooler.  The idea is based on Warre' Hive design.

The last new piece was the medium super.  Like the bottom two hive bodies, it is full of foundationaless frames.  They do have starter strips of wax.  I glued them into the grooves of the frame top bars and tacked them down with a couple finishing nails.

I have another medium super that I will add eventually.  Don the Fat Bee Man does not recommend that you put too much empty space into a hive or it will demoralize the bees and set them back.

I also removed a plastic sheet that slid under the screened bottom board.  With spring having sprung, I don't think we are going to have anymore freezing nights.

All the new hive parts, like the old, are treated with linseed oil.  I used green spray paint on the roof for a little color and to match our house.

When I opened the hive, I discovered the bees had started building four combs in the second hive body.  The comb was white and empty except for bees crawling on it.  It is encouraging that the bees were already working hard on filling the second hive body box with drawn comb.  The drawn comb was beautiful.  I'm glad I didn't mar the bees work with foundation.

Note, some of the wax starter strips on the top bars in the second hive body were dangling down into the hive body.  I figure the bees will work around those.  Hopefully, the comb will keep going on straight.  I glued the starter strips to the top bars of the medium super so maybe it will hold this time.

Sunday, April 28, 2013

Shiitake Mushroom Dowel Spawn Innoculation and Lessons

This weekend I used up all my soy wax innoculating white oak logs with shiitake mushroom dowel spawn. I bought 1000 from Fungi Perfecti.

I made several purchases from Fungi Perfecti to create our first shiitake mushroom garden. First, I bought 100 plugs and one pound of soy wax.

The 100 plugs were not even enough to innoculate one 7 inch diameter, four foot log.  Therefore, I called and ordered 1000 plugs.

I used the 1000 plugs to innoculate the rest of the first log, and three more.  Then, I ran out of wax and gifted the rest of the spawn to my neighbor.  I think I had around 300-400 plugs left.

It is a pretty good bit of work to make a shiitake mushroom garden.  I'm talking about just the drilling and innoculation process after you gather the logs.  I have a pretty good drill and it still took several hours to do all the work.

Here are the steps you should follow to efficiently innoculate logs.  (These steps were discovered to be the most efficient after trial and error.)

  • Drill all of the 5/16 inch holes in a log.   Each hole is 4 inches from the next laterally.  Go down the log drilling holes.  Turn the log and drill holes about 2 inches below the first line, staggered so the new row lines up roughly in the middle of the previous row.  Turn and drill. Turn and drill.  Do this until you have rows of 5/16 inch holes all around the log.
  • Hammer in the plugs with a rubber mallet.  Hammer plugs into all holes.
  • Melt about 3 ounces of wax in a metal container.  Apply the was with a brush on each of the plug spawn to seal the log.  If you need more wax, refill and keep covering your spawn plugs.
  • Repeat the process log by log.
I used an empty bean can for my wax container and heated at very low over my gas stove.  If you try to cover too many plugs your wax will cool down before you can finish.

I like to do one log at a time because it gives a sense of accomplishment with each log. Also, my hands got tired of drilling after so many holes in a log.

I discovered that chickens like the taste of soy wax.  Keep your chickens away from your project or they may decide to eat your wax off your logs in your garden location.  Hopefully, my chickens do not decide to eat my wax!

I ran out of wax after four logs.  One pound is not enough.  I recommend you purchase the ten pound bag of wax and 1000 spawn.  That should insure you have enough wax to cover all your spawn.  1000 spawn will innoculate about seven or eight logs (6-7 inch diameter) cut to four foot lengths.

I stacked my logs horizontally about twenty feet into my zone five edge under the canopy of a large oak. Fungi Perfecti recommends a vertical stack, but I did not want to risk getting invasive fungus into my logs before the shiitake spreads throughout the wood.

I will need to move my stack from its present location.  I discovered that even though they are located under a large oak, my logs are getting some sun in their present location in the noon sun. The sunbeams shine right down through a hole in the canopy on top of my stack.  

No problem.  It just takes some manpower to move them.

Hopefully, we have shiitake next year around this time.  

Wednesday, April 24, 2013

Disbudding Kids

Our young bucklings are now going on two weeks old. At age four days, we undertook to disbud the young kids.

There are arguments for not disbudding goats. One, the horns are defensive and help to deter predators. Two, and more importantly, the horns aid the goat's circulatory system. A lot of blood flows through a goat's fully developed horns. The system helps a goat body adjust to extremely hot and cold weather. These are good reasons why a person would choose not to disbud her goat.

However, there are some negative aspects of horns. First, horns can be dangerous to other animals and people. Second, horns can be dangerous to goats in that they may cause a goat to become hung in fences or other objects.

We chose to disbud our kids for several reasons. First, our two adult does are disbudded so they would be disadvantaged in a herd of goats some of which have horns and some of which do not. Secod, we live in the temperate climate of the North Carolina piedmont so the circulatory system benefits of horns are less necessary at our homestead than in a more extreme environment. The primary factor for us was safety. We do intend to apply a paddock shift with the goats and they will encounter lots of fences. They also will be on pasture with our horses. The risk of a veternarian bill to treat a potentially disemboweled horse would be a problem for our family.

The procedure is to burn the young kid's head where the horns are just beginning to grow. The burning, if done successfully, destroys the goat's glands that cause the horns to grow. Our bucklings were disbudded at day five. Even at day five, you could feel the developing horns growing in the kids.

We gave our goats Ow-eze before the process. This herb intoxicated the animal. The procedure involved a small, narrow box. The four-day old kid was inserted into the box, which had an opening and lip on one end for his head. The kid's head was held against the lip and the tool, a hot iron made into a small circular ring, applied to and around the horn area. After burning the head, a spray was applied to the injury and the kid was returned to the herd.

Immediately after the procedure, one of the two kids seemed a bit disoriented (perhaps partially from the effects of the Ow-eez), but within an hour, the two bucklings were both running and jumping as if the experience and injury were totally forgotten.